#UPDATE2: This post has been updated to include the jailbreak guide for iOS 4.3.3. The same method is used as for 4.3.2 and 4.3.1.
#UPDATE: This post has been updated to include the jailbreak guide for iOS 4.3.2. The same method is used as for 4.3.1.
Before reading anything below please note the following. If you are not interested in updating to iOS 4.3.1, not interested in jailbreaking or not interested in jailbreaking iOS 4.3.1 or 4.3.2 in particular, please read this post and back up your SHSH blobs for the 4.3.2 firmware. This will ensure that if you do wish to jailbreak later, you will definitely be able to or if you need to restore to iOS 4.3.2, that will always be possible.
iOS 4.3.1 basic information:
- For iPhone 3gs/4, iPod touch 3g/4g, iPad 1/2
- Baseband 05.16.02 for iPhone 3gs, 04.10.01 iPhone 4, 07.11.01 iPad 1 3g model
- For a complete feature list of iOS 4.3.1 see this.
iOS 4.3.2 basic information
- Bug fixes
iOS 4.3.2 basic information
- Location tracking issue fix
Jailbreak basic information
- Works on both PC and OSX
- Unthethered (only need to do it once)
- Does not currently work for iPad 2 (but does work for all other devices above)
- If you need to update without updating your baseband (in other words if you want to unlock) this.
The method
0. Go back to the top of the page, read the first paragraph.
Delete any files on your device that you installed in cydia from Hackulo.us such as appsync. If you do not do this, you many end up with a device that gets stuck in a restore loop. You have been warned! More inforamtion can be found at the bottom of this post.
- Download the iOS 4.3.1 or iOS 4.3.2 firmware for your device. Get the firmware you need from here and remember the location you saved it to. Note that if you have an iPhone 4, unless your phone is on the Verizon USA network you have a GSM model not CDMA.
- Download redsn0w for OSX or Windows. Both programs are pretty much the same. I will be completing the tutorial with the OSX version, so the screen-shots may vary slightly to the Windows edition.
- Open iTunes and plug your device in. When you get to the screen below either hit "restore" while holding "option/alt" if using OSX or "shift" if using Windows. Browse to the IPSW file you downloaded in step (1) highlight it and press choose/open.
- Wait for iTunes to finish updating your device.
- Open Redsn0w and hit "browse" select the same IPSW file you just selected in iTunes.
- Hit open, wait for verification then hit next.
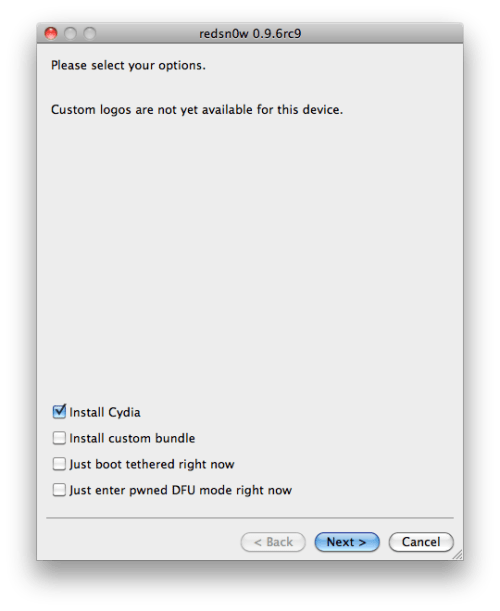
- Wait until you reach the screen below. At this point, unless you are familiar with redsn0w and know what the other options do, just check the box marked "Install Cydia".
8. From this point forwards the program is pretty self explanatory. Make sure that you follow the on screen instructions carefully, especially the DFU mode part.
9. After you have clicked finish and your device reboots, Cydia should be present on one of your home screens. If it is, success you have successfully jailbroken your device. If not, try again from step 5.
Troubleshooting step: If whilst attempting this your device gets stuck in a "recovery/restore loop" (basically iTunes prompts you to restore or says your iPhone is stuck in recovery mode, after after restoring it multiple times) read this post
After the process is complete, open Cydia, hit the "developer, no filters" option when prompted and allow Cydia to update fully. If you have not jailbroken before or if the option is presented to you, make sure to hit "make my life easier".
Thanks for reading, any questions please ask away below!
For more relevant information please see my jailbreak faq.

2 comments:
keep posting like this it’s really very good idea, you are awesome!
paxil
Thanks for your comment!
Post a Comment